Create Bank Account Setup
You can create a bank account setup to establish a connection between the bank and Gotransverse on the Payment Matching Setup window.
IMPORTANT: Before creating a new bank account, the following items will need to be available or created:
-
Holding Account Number — Required. A billing account that can be used as a holding account where transactions that have not been automatically matched by Payment Matching application can be posted. Refer to Create Customer and Associated Billing Accounts for more information about creating a holding billing account if needed.
-
File Type — Required. The CAMT053 option should be available. If not, please contact Gotransverse Technical Support.
-
Rate Set — An optional value that is only utilized when the Currex application is used for currency conversion rates. The list of values will only be populated if rate sets are defined in Currex. The rate set field is used as part of the currency conversion of AR transactions if the currency of the transaction does not match the currency of the GL account where the transaction is being posted.
-
Refund Reason — Required. The selections shown in the Refund Reason drop-down list is generated from the list of Payment Change Reasons created in the Setup application’s Reasons module. Refer to Payment Change Reasons for more information.
-
Ledger — Required if using GL 3.0 version. Ensure that the AR ledger that will be associated with the account has been set up and includes a posting rule set (required for setup). The ledger is required to match payments using auto-matching rules (refer to Create Transaction Type with Matching Rules). Refer to AR Ledger Module for more information about creating and managing AR ledgers and Posting Rule Sets.
When you set up a bank account, you have the option to map tags in the transaction file to Gotransverse payment method custom fields. When payment matching transactions are posted, mapped tag values are inserted into the payment method custom fields for increased visibility into bank processed payments.
Contact Gotransverse Technical Support if you need help configuring bank setup information for the Payment Matching application.
-
Select Payment Matching from the Gotransverse application menu
 .
. -
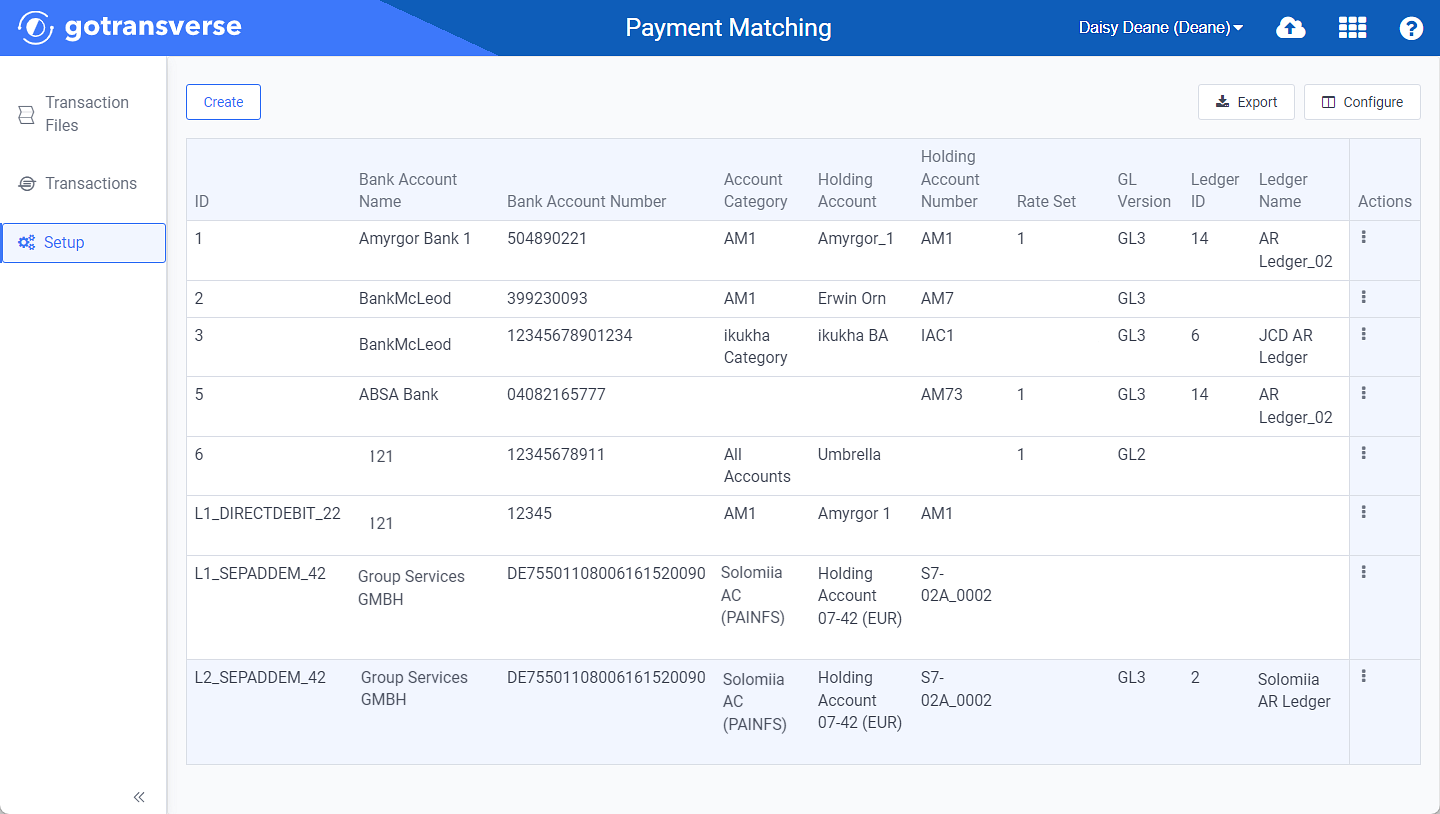
Click Setup in the left pane. The Setup window displays a list of bank account, responsive file, and lockbox file setups.

Setup Window
Click the
 icon in the left pane to hide it. Click the
  icon to open it.
You can manage what columns are displayed in the table by clicking the Configure button and selecting column names. For AR transactions, you can display mapped tags from the transaction file as columns in the table.
You can also filter each table by clicking the Filter button to select those transactions you wish to see.
-
Click the Create button and select Bank Account Setup to open the Create Bank Account Setup window.

Create Bank Account Setup Option
-
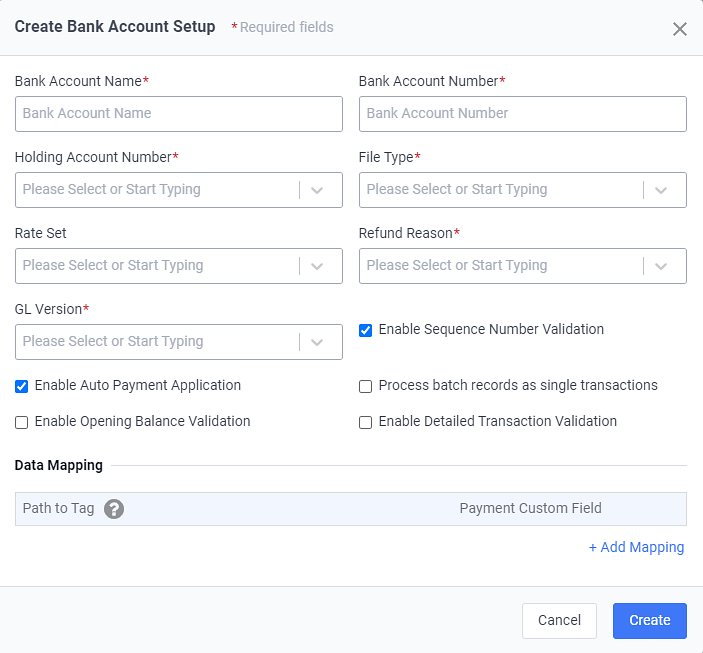
On the Create Bank Account Setup window, complete the required and relevant fields:

Create Bank Account Setup Window
Required fields are marked with an asterisk.
-
Bank Account Name* — Enter a bank account name.
-
Bank Account Number* — Enter the bank account number.
-
Holding Account Number* — Select the holding account from the drop-down list.
-
File Type* — Select the file type from the drop-down list. Currently, the only available field type is CAMT053.
-
Rate Set — Select the rate set from the drop-down list. Rate sets are used for storing the information on currency exchange rates, providers, and valid to provide conversion rates.
-
Refund Reason* — Select the reason for refunding a transaction from the drop-down list. The list is generated from the list of Payment Change Reasons created in the Setup application’s Reasons Module module.
-
GL Version* — Select the GL version the bank account should use to ensure the Gotransverse platform posts GL entries in the appropriate GL version when payments are matched and posted. The options are GL 2.0 or GL 3.0.
The GL version varies by tenant depending on the platform configuration. For example, GL 2.0 is for tenants who use the Receivables application, and GL 3.0 is for tenants who use the Revenue Management application.
-
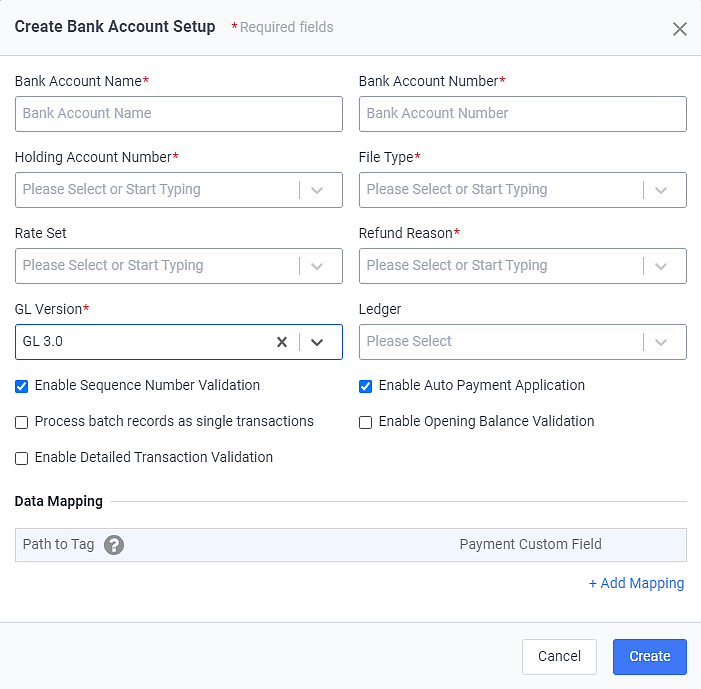
Ledger — If you selected GL 3.0 for the GL Version, also select the ledger where GL entries should be posted.
Credit Adjustment Reversals transactions will be available if the Process credit adjustment reversals in the Payment Matching application system setting is set to True. Additionally, if these type of transactions will be parsed by matching rules, the transaction type would be configured when setting up transaction types for a bank account.Refer to System Settings for more information.

Create Bank Account Setup - With Ledger
-
Enable Sequence Number Validation checkbox — Select to enable sequence number validation. Sequence Number Validation determines that the following sequence of the file that will be processed is with an index that is one point higher than the previous one.
-
Enable Auto Payment Application checkbox — Select to enable automatic payment application to the oldest open invoice on a billing account.
If you select the checkbox, all Payment Matching transactions posted to Gotransverse will automatically apply any overpayment (if the invoice application has been specified) or payment (if no invoice application has been specified) starting from the oldest open invoice.
If you clear this checkbox, all Payment Matching transactions posted to Gotransverse will not automatically apply any overpayment (if the invoice application has been specified) or payment (if no invoice application has been specified) starting from the oldest open invoice. The transaction will remain unapplied on the account until you manually apply it to an invoice.
For existing accounts, the Enable Auto Payment Application option is enabled by default. You can change it when editing the bank account setup.
-
Process batch records as single transactions checkbox — Records are processed as single transactions.
-
Enable Opening Balance Validation checkbox — Gotransverse performs an additional validation as part of bank file processing, including validating the Ending Balance and currency from the previous file match the Opening Balance and currency from the current file.
-
An error will occur if the opening balance from the current file does not match the closing balance from the previous file. Hover over the Validation Warning message in the File Status column to see warning message. You can ignore these validation warnings (similar to bank file processing errors) by selecting Ignore Validation Warning from the Action drop-down menu for that file.
-
If the transaction file does not contain an opening balance, the bank file processing will fail and be moved to the Validation Warning state.
-
If the transaction file does not contain a closing balance, the bank file processing will fail and be moved to the Validation Warning state.
-
If the transaction file has a matching opening balance but is of a different currency than the previous file, the bank file processing will fail and be moved to the Validation Warning state.
-
If the checkbox is selected, the individual bank account summary on the Transaction Files window will include a new Enable Opening Balance Validation field that will display Yes. If not selected, the field will display No. The Transaction Files window will also include File Opening Balance and File Ending Balance fields that display that data.
-
If you select both Enable Sequence Number Validation and Enable Opening Balance Validation checkboxes, Gotransverse will first check to see that the sequence number of the next file to process comes sequentially after the last file that was processed. If that check is valid, then the closing balance in the processed file, and the opening balance in the file that is attempting to be processed will be compared. If those two balances match, the file is automatically processed for payment matching.
-
If you select only Enable Opening Balance Validation, Gotransverse will look for the ending balance of the latest file that was processed for the ending balance to make the comparison.
-
-
Enable Detailed Transaction Validation checkbox — When selected, single uploaded bank files are validated. The validation process compares the sum of the individual transactions within a single file to the provided summary header values in the file, and if these values do not match, a Validation Warning error message is returned for the file. Based on this error message for the file processing, a user will need to review the file to determine the root cause of the issue and can either correct the file and re-upload, or chose to ignore the validation warning and proceed with processing the file.
-
Data Mapping:
A
 icon next to a field name indicates that information about the field is available. Hover your mouse over the icon to see the information.
-
+ Add Mapping — Click to map a tag in the transaction file to a payment method custom field. Data mappings provide increased visibility into bank processed payments. You can use this information when you perform reconciliations or investigate issues. This data is important for auditing purposes as well. With the Gotransverse Connector Service
 (managed in the GT-Connector application), you can transfer information in payment method custom fields to an ERP system such as NetSuite
  or Workday
  .
.To map multiple tags, add a separate mapping for each tag.
-
Path to Tag — Enter the path to the tag you want to map. Tags are nested in the transaction file. In the path, separate each tag level with a period. Gotransverse assumes the path starts at the <Ntry> tag, so you do not need to include this tag. For example:

Path to Tag Illustration
-
Payment Custom Field — Select an existing payment method custom field to map to the tag. The tag value will be inserted into the custom field when payment matching transactions are posted.
-
-
-
Click Create. The bank account is added to the list of bank accounts on the Setup window.
Topic updated: 10/2024.