Create AR Ledger
Create an AR ledger to hold transactions generated from posting rules based on billing activity and information.
Before creating an AR ledger, you will need to create a chart of accounts and a posting rule set and enable a currency exchange rate processor (if converting currency in the AR ledger). Gotransverse highly recommends coordinating with Gotransverse Technical Support before creating a production AR ledger.
You may want to initially create a Draft AR ledger using the minimum required fields and later add the chart of accounts, posting rules, and accounting periods required to change it to Active status.
All GL accounts used in the posting rule set must be found in the chart of accounts assigned to the same AR ledger.
Complete the following steps to create an AR ledger:
-
Select Revenue Management from the Gotransverse application menu
 .
. -
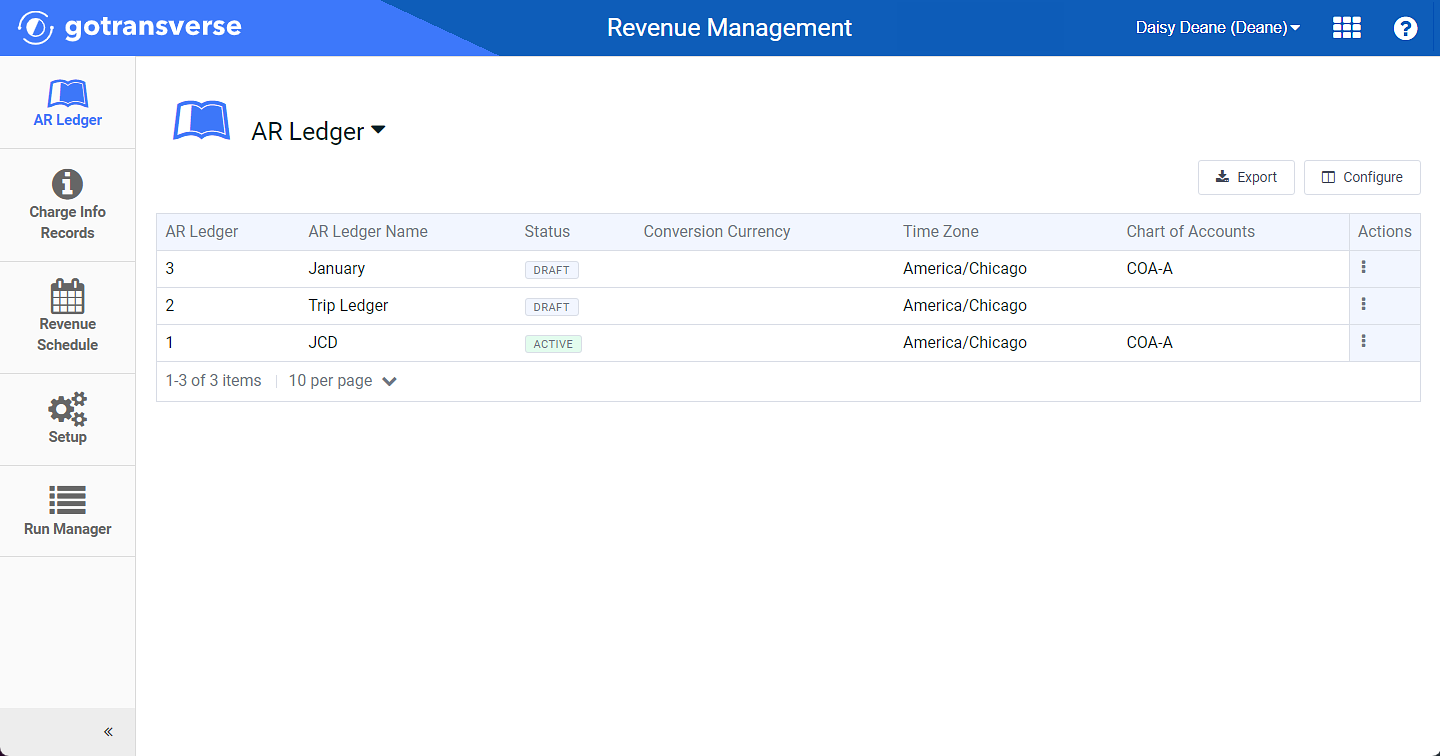
Click AR Ledger in the left pane.

AR Ledger Window
Click the
 icon in the left pane to hide it. Click the
  icon to open it.
You can manage which columns display in any table with a Configure or Columns button by clicking the button and selecting desired columns. In addition. If the table includes a Filter button, you can filter the table contents. If the table includes an Export button, you can export visible table contents (up to 50) to a CSV (comma-separated values) file. Refer to Data Tables for more information about using these features.
-
Select Create AR Ledger from the AR Ledger drop-down menu.

AR Ledger Drop-down Menu - Create AR Ledger Option
-
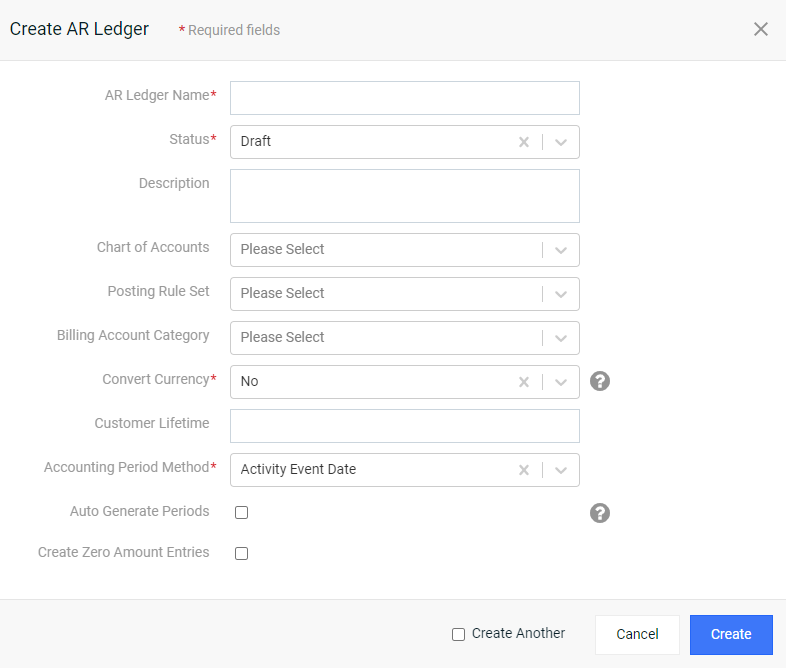
Complete the relevant fields in the Create AR Ledger window.

Required fields are marked with an asterisk.
-
AR Ledger Name* — Add a name for the AR ledger. The name must be unique.
-
Status* — Select one of the following statuses for your AR ledger:
-
Draft: The AR ledger configuration can be edited after creation when in Draft status. No transactions can be created for this AR ledger.
-
Active: The AR ledger configuration can be edited after creation when in Active status. Transactions can be created for this AR ledger.
Active status is only available to select in the Create AR Ledger window once you have completed these fields:
-
Chart of accounts is assigned.
-
Posting rule set is assigned.
-
Convert currency settings are selected.
-
Accounting periods are created. This can be accomplished during AR ledger creation using auto-generate periods.
-
-
Description — Add any additional information you need regarding this specific AR ledger.
-
Chart of Accounts — Select a chart of accounts. Only Active chart of accounts are available. The chart of accounts will define which GL accounts are used with this AR ledger and how those GL accounts are structured.
-
Posting Rule Set — Select a posting rule set. Only Active posting rule sets are available. The posting rules determine when and why transactions post to this AR ledger.
-
Billing Account Category — Select a billing account category. You can add more than one billing account category to an AR ledger.
When a billing account category is assigned, the transactions created are limited to billing activity for accounts with the specific billing account category.
-
Convert Currency* — Select one of the following options from the drop-down menu:
-
No: Currency conversion is not needed. Transactions are created using the original currency and amount.
-
Yes: Currency conversion is needed. Transaction amounts are created for both the original currency and the conversion currency.
-
Conversion Currency*: The currency to which the original currency on transactions will be converted.
-
Currency Exchange Version*: The currency exchange rate processor used to convert the currency. Refer to Currency Conversion Processors.
-
-
-
Customer Lifetime — Enter the expected customer lifetime defined by the number of months. This value is used to amortize the deferred amount of a One-Time product purchase over the defined period of time when certain posting rules are instantiated.
-
Accounting Period Method — Defines the posted dates. Select an option from the drop-down list.

Accounting Period Method Drop-down Field Options
-
Activity Event Date: The date a Gotransverse billing transaction is created. This method looks at the accounting periods that are open on the date the activity in Gotransverse occurred to determine the posted date The date when the transaction is intended to be sent to client's ERP system.
-
Entry Created on Date: The date the accounting entry is created by the system. This method looks at the accounting periods that are open at the time the GL Run creates accounting entries to determine the posting date.
The Accounting Period method and posted date do not affect the occurred-on date of a transaction, which is the same under both methods.
-
-
Auto Generate Periods checkbox — Select the checkbox to automatically generate an accounting year with accounting periods by calendar months. You will have an opportunity to edit the accounting periods, if needed. If the checkbox is selected, three additional fields are required to continue:
-
Period Name*: Enter the name of the accounting year.
-
Start Date*: Enter the first date of the accounting year. You must select the first date of a month.
-
Number of Months*: Enter the number of monthly accounting periods to create after the start date. All accounting periods will start with the first of the month. For example, if the start date is January 1st, then the following months will have the 1st as the start date.
Clear the checkbox if you do not want accounting periods auto-generated. You can manually create accounting years later (refer to Create Accounting Years and Accounting Periods.
-
-
Create Zero Amount Entries checkbox — Select the checkbox to allow the posting rules to post transactions even when billing activity has zero value.
Clear the checkbox to prevent the posting rules from posting transactions when billing activity has zero value.
-
-
Click Create.
AR ledgers must have a chart of accounts, a posting rule set, an accounting calendar, and an Active status to start generating transactions. Refer to the following topics for more information on completing the AR ledger configuration:
-
If the accounting periods were not auto-generated as the AR ledger was created, refer to Create Accounting Years and Accounting Periods for instructions.
-
If the AR ledger is in Draft status, refer to Edit AR Ledger for instructions on how to add the chart of accounts, add the posting rule set, and change the status to Active.