Create System Job
Complete the following steps to create a system job:
-
Select Scheduler from the Gotransverse application menu
 .
. -
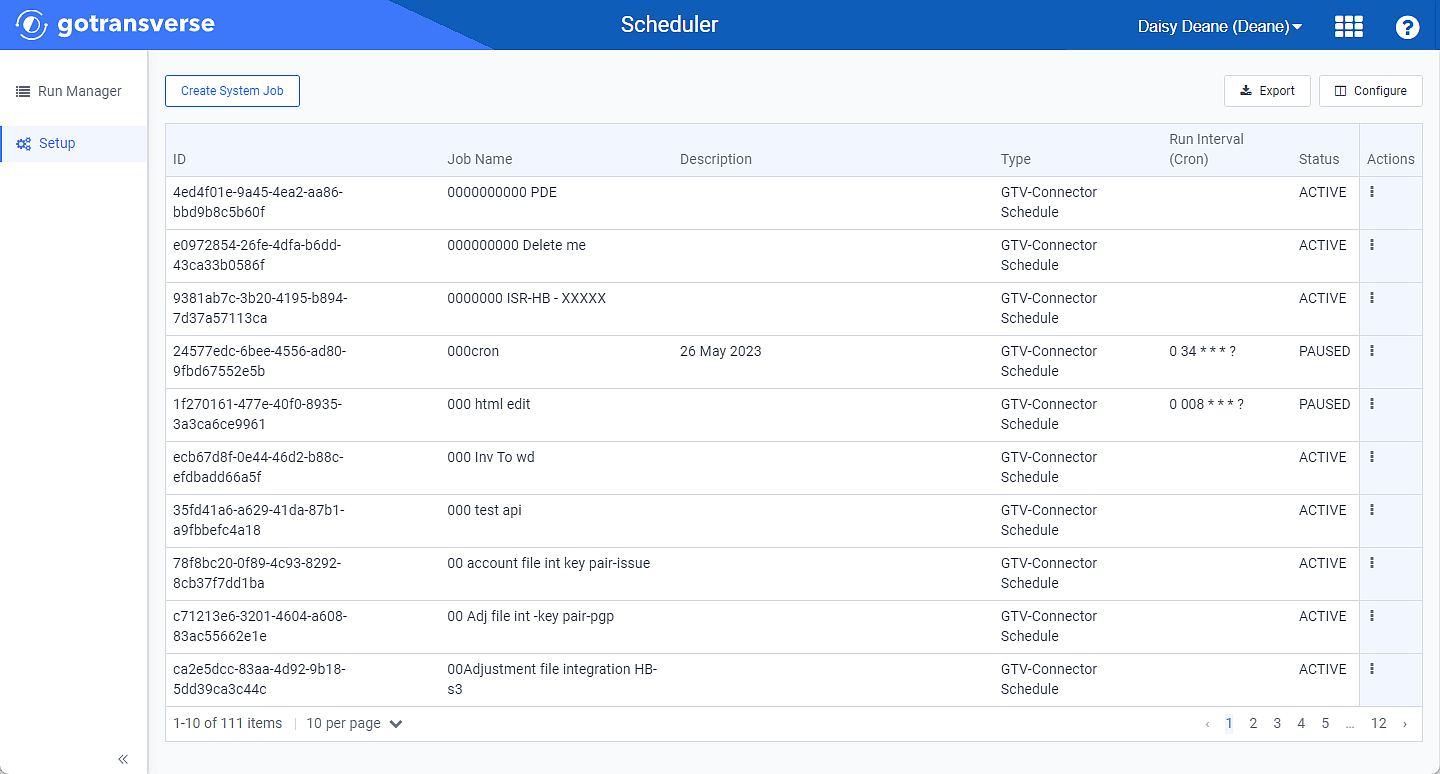
Click Setup in the left pane. The Setup window displays a list of created Scheduler jobs.

Setup Window
Click the
 icon in the left pane to hide it. Click the
  icon to open it.
 -
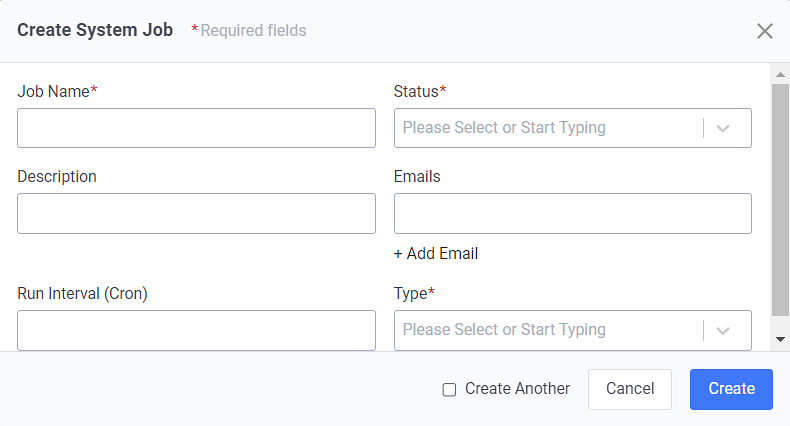
Click the Create System Job button to open a Create System Job window.

Create System Job Window
-
On the Create System Job window, complete the required and relevant fields:
Required fields are marked with an asterisk.
A
 icon next to a field name indicates that information about the field is available. Hover your mouse over the icon to see the information.
 -
Job Name* — Enter a name for your scheduler job.
-
Status* — Select one of the following statuses for your job:
-
Active: The job will run according to its scheduled or manual job run.
-
Paused: The job will not run according to its scheduled run. If the job is run manually, it will be rejected.
-
-
Description — Enter additional information about this job.
-
Emails — Enter the email address of an individual you want to receive notifications. For most GT-Connector invoice jobs and extracts, email recipients can receive notifications during job run stages so they are alerted to review job runs and take action, if necessary. Notifications include information such as the number of aggregated records, delivered and errored invoices, or error messages.
Gotransverse strongly recommends that you provide at least one email address to ensure someone is notified about job errors and warnings. Data transmission problems can result in inaccurate or incomplete financial data.
-
Add Email — Click to add an additional email address for notifications.
-
Run Interval (Cron) — Enter information in cron format to run the job at a scheduled time. Alternatively, you can run the job manually through the Run Manager window in Scheduler.
The standard cron format consists of six fields separated by spaces. For example:
<Minute> <Hour> <Day_of_the_month> <Month_of_the_year> <Day_of_the_Week> <Year>
For example, 0 0 9 1 1/1 ? * runs the job on the first day of each month, at 9 am.
For help with cron expressions, visit the CronMaker website
 .
. -
Type* — Select the type of system job. Based on what you select, additional custom fields display for job type properties.
Data extract system job types, like GL3 Extract, that use an AWS S3 bucket to transfer and receive files must have an Amazon Web Services (AWS) Access Key ID that includes permission to execute the GetBucketLocation call with AWS. This call tests the connection to the AWS S3 bucket and verifies the user credentials. This is not a default permission, so you will need to work with AWS or Gotransverse Technical Support to add this permission.
Some of the job Types include:
-
Data Extract {Invoice}-specific fields:
-
E-Mail Notification States: Select the job stage notifications you want email recipients to receive during a job run so they are alerted to review job runs and take action, if necessary. Emails will contain information like key performance indicators, errors, reasons for data validation failures, and successes/failures, depending on the types of notifications you select.
-
The notification options relate to the Run Statuses listed in the table in the Viewing Scheduler Job Results section.
Source notifications refer to Gotransverse import stages. Target notifications refer to data transfer stages to a customer.
-
-
Max ID Range checkbox: Click the checkbox to use IDs instead of dates for the job run’s data selection methodology. This option requires custom configuration.
-
Inception Date: Enter a date to run the job on a rolling date range. The inception date or rolling date range is based on when the entry was created, instead of when the transaction occurred in Gotransverse (due to backdating orders, payments, etc.). Each run will query data since the last job run.
-
GitLab Group: Enter the group information Gotransverse provided to you.
-
GitLab Branch*: Enter the branch information Gotransverse provided to you.
-
Filename*: Enter the source file name. For example, {filename}_{idx}_{timestamp}.csv. The idx starts with 1 and increments for each file delivered during the given job run. The {timestamp} element is replaced with the date format selected in the next field. If {timestamp} is not included in the Filename where you would like it to be included, it will be appended to the end of the file name.
A
 icon next to a field name indicates that information about the field is available. Hover your mouse over the icon to see the information.
 -
Format Filename with Date*: Select a date format.
-
Encrypt Data Extract with PGP Key Prior to File Egress: Click the checkbox to enable PGP encryption when Gotransverse sends data extract files to your sFTP server as part of this job.
-
-
Invoices to NetSuite-specific fields:
-
NetSuite Host*
-
NetSuite Account*
-
NetSuite Consumer Key*
-
NetSuite Secret*
-
NetSuite Token*
-
NetSuite Token Secret*
-
-
PDE Connector-specific fields:
-
Inception Date: Enter a date to run the job on a rolling date range. The inception date or rolling date range is based on when the entry was created, instead of when the transaction occurred in Gotransverse (due to backdating orders, payments, etc.). Each run will query data since the last job run. When an inception date is specified, the PDE Connector will create Incremental Extracts. If not specified, it will create Full Extracts.
-
Incremental Extracts: Uses the rolling date range methodology (inception date is specified and the job is enabled to run on a rolling date range) to pull all records with an updated_on date between the start and end date. If the view does not have an updated_on, the created_on or start_date are used instead.
-
Full Extract: Always pull all records available at run time.
-
-
Extract Selection: Select a value from the drop-down field.
-
Format Filename with Date*: Select a date format.
-
-
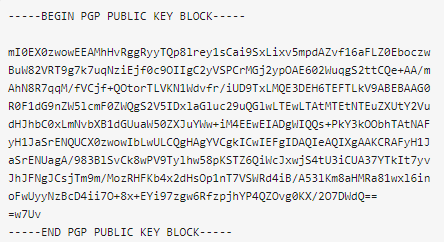
PGP Public Key*: If you are encrypting the data extract, enter the PGP public key you generated. The key persists across job runs. There is no restriction on the number of lines in the key or the number of characters per line. The following is an example of a properly formatted public key:

PGP Key Block
Complete the following steps to ensure your key is properly formatted:
-
Remove any leading or trailing spaces.
-
Include the lines marking the beginning and ending of the key block.
-
Include a single blank line between the begin key block header and the key text.
-
Remove any extra header lines, such as the version. Extra header information can cause parsing errors.
-
-
Delivery Method*: Select either sFTP or AWS S3 to connect Gotransverse to the source where you want your data extract file stored. Based on the option you select, the following fields display:
-
sFTP*: Data server that will securely transfer and store your data extract files.
-
sFTP Host*: Enter the host name of your sFTP, for example, myco.exvault.com.
-
sFTP Port*: Enter the port number of your sFTP, for example, 20.
-
sFTP Username*: Enter the user name of your sFTP.
-
Authentication Method*: Select the authentication mode that Gotransverse will use to access your sFTP.
-
Key-Pair: Select to allow for a Gotransverse-generated private key authentication to connect to your sFTP.
-
Password: Select to use your sFTP password for authentication.
-
sFTP Password*: Enter your sFTP password.
-
-
-
-
S3*: Data server hosted by Amazon Web Services (AWS) that will securely transfer and store your data extract files.
-
AWS Access Key ID*: Enter your access key ID provided by AWS.
-
AWS Secret Access Key*: Enter your secret access key provided by AWS.
-
S3 Bucket*: Enter your AWS S3 bucket name.
-
-
File Path*: Enter the directory path of the AWS S3 or sFTP where the file should be delivered. For example, /myco/mks/data/invoice-files_[timestamp}. The {timestamp} element is replaced with the date format selected in the next field. If {timestamp} is not included in the Filename where you would like it to be included, it will be appended to the end of the file name.
-
Format Remote File Path with Date: Select a date format.
-
Invoices to Workday fields:
-
E-Mail Notification States: Select the job stage notifications you want email recipients to receive during a job run to alert them to review job runs and take action if necessary. Emails will contain information such as key performance indicators, errors, reasons for data validation failures, and successes/failures, depending on the types of notifications you select.
The notification options relate to the Run Statuses listed in the table in the Viewing Scheduler Job Results section.
Source notifications refer to Gotransverse import stages. Target notifications refer to data transfer stages to a customer.
-
Use Custom Configuration Mask: Click this checkbox if Gotransverse will do custom work to provide complex mappings specific to your implementation.
-
Source Detail Level*: Controls the level of detail of the invoice data you are sending.
-
Invoice Item Charges: This option provides enough detail for most cases.
-
Usage Event Charges: This option creates invoice lines in Workday based on individual usage events and usage event charges in Gotransverse. It allows you to map to additional usage-specific data fields.
-
-
Inception Date: Designates the earliest possible transactions to include in the aggregation for the first job run. This is the overall start date of the job. Subsequent job runs will include transactions that have happened since the previous run (based on a rolling date range from the date of the last job run to the current date).
-
Workday Data Center*: Name of the Workday data center that will receive the API payload.
-
Workday Host*: The URL for the Workday host.
-
Workday Tenant*: Name of the Workday tenant that will receive the API payload.
-
Workday Username*: User name for the Workday integration system user.
-
Workday SOAP Password*: Password for the Workday integration system user.
-
Allow Attaching Workday Custom Objects: Select to specify the REST client ID, client secret, and refresh token.
-
-
GL3 To Workday SOAP-specific fields:
-
Inception date
-
Workday Data Center*
-
Workday Tenant*
-
Workday Username*
-
Workday SOAP Password*
-
-
-
Click Create.
For more information about completing custom fields and advanced configuration, please contact Gotransverse Technical Support.
Your job is added to the scheduler job list on the Setup window. If the job status is Active, and you configured the Run Interval (Cron), your job is set to run at the indicated interval. Otherwise, you can manually run an Active job (refer to Manually Run System Job).
Topic updated: 10/2023.